


![[hasnt been used much] G Hoffman - photo William Beaucardet - a](https://dnan0fzjxntrj.cloudfront.net/Pictures/274x183/0/2/9/44029_hasntbeenusedmuchghoffmanphotowilliambeaucardeta_116713_crop.jpg)


What causes open seams? How do you find them? Stacey Styles from the Women in Lutherie community investigates
Discover more lutherie articles here
Open seams are a common occurrence among our beloved violin family of instruments. Some openings are obvious and easy to see. Sometimes a distinct change in tone brings a player to my shop, suspecting an opening. Other openings are detected only during a routine maintenance check. I strongly recommend periodic maintenance checks!
So what’s going on?
Your instrument is a dynamic structure made from an elastic material. We don’t usually think of wood this way but, as I often hear myself saying, wood moves. It responds to string tension, vibrations, weather changes, climate and player interface. Wood naturally absorbs moisture in humid conditions and releases it when the environment is dry, essentially expanding and contracting through a cycle of changes that we might not even be aware of. Most of the movement happens across the wood grain, for instance across the front and back of your instrument. Because the front and back are glued to a rib structure that is considerably more stable, the seams can be a point of tension, and when there is an overload, what happens? Pop!
Violin family instruments are assembled with hide glue, which is strong, but will release under certain conditions. It is possible that your annoying open seam has prevented an actual crack in the wood. This characteristic of hide glue to be reversible enables us restorers to open an instrument when needed, for repairs. That said, it is important to take care of an open seam as soon as possible for best performance and to prevent further complications.
Carefully prepared hot hide glue is the only glue that should be used to close an open seam. Therefore, a trip to your luthier is the solution. However, there are things you can do to detect an open seam, and possibly discern how urgent the situation is.
Read: Looking after your instrument: an introduction to soundposts
Read: Looking after your instrument: a guide to cleaning and polishing
Read: Looking after your instrument: the secret to bridge placement
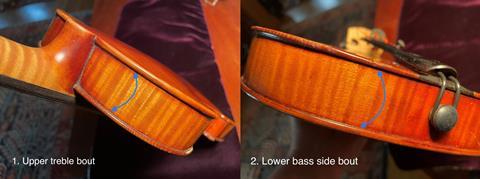
Most often, we see seam openings at the upper treble and lower bass side bouts of a violin (figs. 1 and 2). Heat and moisture can weaken a glue seam and our bodies produce both. So it make sense that the areas close to a player’s hand and body would be especially vulnerable. That’s where I check first. How do you tell if something’s open if it’s not obvious? Some people have luck gently tapping the edges with a finger and listening for a change of sound that might indicate something is loose. Indeed, there are times when I’ve picked up a cello and my hand brushing against an edge tells me there is a seam open before I even look. But when I do a thorough check, I secure the instrument somehow and in good light, gently flex the edges with my fingers, all along the entire perimeter of the front and back, looking and feeling for openings. If it’s there, I will find it.
Generally speaking, open seams are a fairly common occurrence with a simple fix. But there are a few scenarios that may warrant a better awareness on the part of players.
A seam that remains unglued may migrate and cause a more complicated gluing operation at the rib and upper and lower block areas. A seam that has released right over the blocks can leave an instrument seriously vulnerable under string tension, possibly allowing the neck to drop or the end block area to distort. Here’s a bit I wrote a while back about that last scenario.
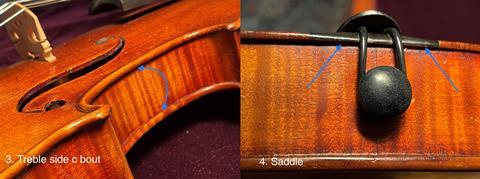
An open seam at the C-bouts, especially on the treble side, will drastically affect the functioning of the sound post, resulting in tone loss (fig. 3). Do not be thinking that a snug post would cause an open C-bout! But it’s true that a luthier would want to check the fit after gluing in case some adjustment is warranted.
There are a couple of additional things players should be aware of. The saddle is at the lower end of your instrument near the end button/pin (fig.4). It carries a heavy load. String tension can sometimes cause the saddle to release and start to roll forward. Take a look there periodically to be sure that it is securely glued in place.
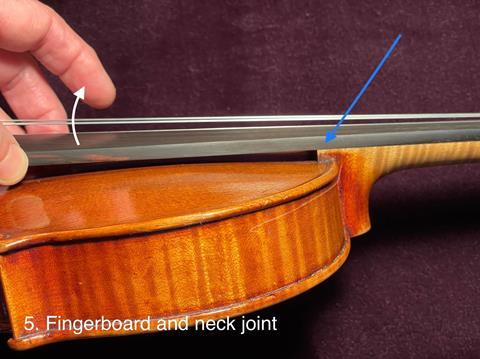
Lastly, an easy check can tell you something about how well your fingerboard is attached to the neck of your instrument. Gently push the fingerboard up from under the wide end and watch where the board joins the neck to see if a gap emerges there (fig. 5). The neck is under a lot of string tension and much of its strength comes from a securely attached fingerboard.
It may be impossible to prevent all seam openings, but care and awareness can help catch a minor problem while it’s still easy to remedy.
All photos courtesy of Stacey Styles
Stacey Styles is a violin restorer based in Massachusetts, USA.


Best of 2022: The Strad’s 12 Days of Lutherie

Revisit our most popular lutherie articles from 2022
- 1
- 2
- 3
- 4
- 5
- 6
 Currently
reading
Currently
reading
Looking after your instrument: all about open seams and where to find them
- 8
- 9
- 10
- 11
- 12


No comments yet