


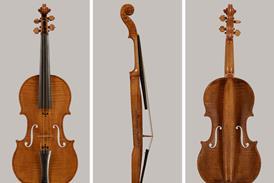


From the Women in Lutherie community: Munich-based luthier Lisa Hellmich provides a handy picture guide on how to change your strings with ease

Changing the strings of your instrument by yourself makes life as a musician so much easier. If you are on the road or practise a lot it is essential to provide the best sound quality possible and be prepared in case a string breaks. But not just when they break - which is a common misbelief - also when they wear out. This happens approximately once a year, then it is time to maintain your instrument. Serious players can wear out their strings within weeks! The consequences are a loss of sound quality and playability. That’s why you should learn to do it yourself and do your instrument a favour by gifting it new strings on a yearly basis, at least.
Many string players who visit my workshop fear the process of restringing. They are afraid of snapping strings or causing damage on their beloved instrument.
With this guide I want to provide a step by step method on how to change the strings easily when and wherever you need it. The perfect time to start is when you mastered the tuning process with the pegs.
Check your strings if they sound dull, appear dirty, especially worn out or fraying.
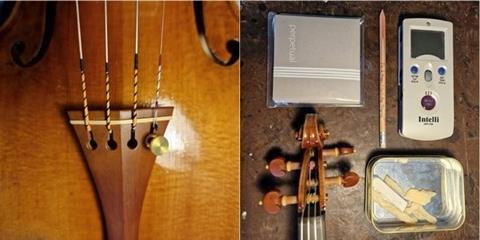
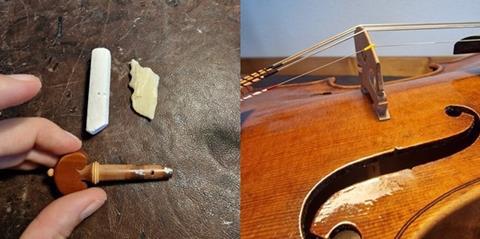
Among the many types of strings, there is one significant difference: Strings with a loop end, as can be seen on the E string on the photograph and those with a ball end. The choice of the sound character depends on your instrument and the sound you want to achieve.
Place your instrument in front of you, lean it against the table, covered with a soft fabric. Prepare the strings, a pencil and if you like, a tuner or tuning app, chalk and dry soap.
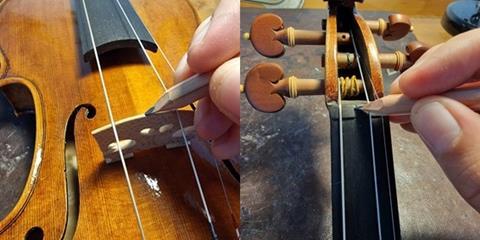
If your strings happen to snap regularly, check that they have a clear path and run smoothly on the bridge and upper nut. Strings tend to break when the tension is too high, and when the notch of the bridge and nut have sharp edges or are too narrow.
The strings also should not rub on another peg. If this happens, visit a luthier to fix it.
One of the main rules is to only change one string at at time to make sure the bridge is held in place and you won’t mix up the pegs later on. The procedure is the same for every string. Slightly loosen the peg of the string you want to change, by turning it towards you. Pull out the string with the other hand. It needs some control to release the tension.
Once the string comes loose, pull it out and remove the end from the tailpiece. Save the old strings in case you need a replacement if you break a string and don’t have a new one yet.
Now that the string is off the instrument, add some soft graphite to the contact points. That means the notch of the upper nut and bridge, so that your string slides through it smoothly. This is to reduce the bridge’s tendency to lean in one direction.
Now is the perfect time to get your fine tuners back in a good starting position and loosen them a little bit.
If your peg is easy to turn, the next step isn’t necessary. But if it tends to get stuck you can lubricate it, with a little bit of dry soap for smoothness and chalk for more resistance at the contact points. There are also peg pastes available especially made for stringed instruments.
Take the new string, make sure that you have the correct one and put the ball end or loop to the tailpiece. Follow the path up to the scroll. The E string usually comes with a small plastic tube. Without any protection, the E string slowly cuts into the bridge. If your bridge already contains a little parchment, you can remove the plastic tube. If it doesn`t have any protection, place the plastic tube so that it protrudes 1mm over the bridge, seen below. This prevents it from buzzing.
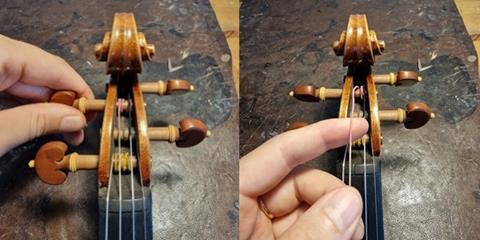
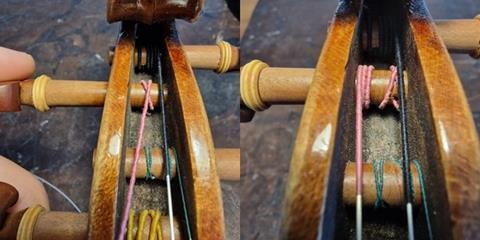
The end of the string goes through the small hole in the peg. There are different theories and methods on how to wind the string. Some experts like to cross the end of the string, which – on cellos – makes sense to me, some people just wind it straight. I prefer to cross the string once to prevent it from slipping. There is a difference between the pegs on the left and those on the right. In general you want the string to always end close to the pegbox and wind it from the thin to the thick part of the peg.

Turn the peg away from you and carefully wind the string without too much pressure.
First, lead the string to the right and once you have a full turn, cross the string and guide it to the edge of the pegbox.
With increasing tension, start controlling the pitch with a tuning app by picking the string with the other hand. That’s how you make sure you won’t stretch the string too much and cause it to break. Be careful with the pressure you apply on the peg because the pegbox can be fragile.
The results might look different, depending on the hole in the peg.
Once the string is in tune, check if the bridge is still straight. It’s very common that it goes out of alignment. The back of the bridge should be perpendicular to the top of the instrument.
The strings have to get used to the tension, so it is normal that they have to be tuned a few times in the following days. To minimise this effect you can rub them a few times with a soft cloth until you can feel the string getting warm. Then tune the string again and repeat the process until it stays in tune.

Now you can continue with the next string. Repeat every step until all strings are attached and in tune.
Still feel unsure? Ask your local luthier or teacher for help.
Read: Looking after your instrument: the secret to bridge placement
Read: Looking after your instrument: an introduction to soundposts
Read: Looking after your instrument: a guide to cleaning and polishing


No comments yet