


Although new items for luthiers are always appearing on the market, violin making involves many tasks for which there is no perfect tool. Here, six makers describe the devices they’ve created for themselves
Tom Croen – purfling machine
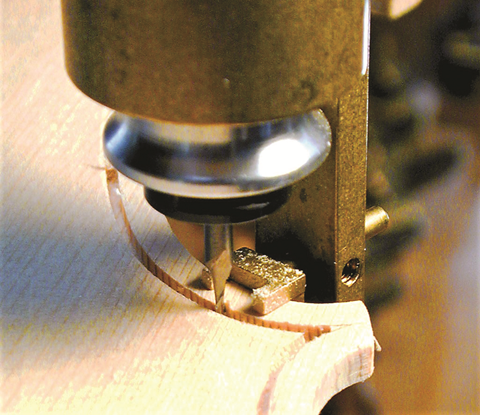
The purfling makes a strong impression when looking at instruments, and I’ve always loved the process. In the 1980s I designed my purfling tool to help carve the channel to reduce the strain on my hands and speed up the task. The first version was rather simple but showed me it could work well, so I set about designing a better one. I had one made by a machinist to my specifications and as I showed it to friends, I started getting requests to produce more.
I wanted the tool to enable the same control as the traditional knives so I intentionally did not mount it on a fixed base. I’ve designed it to be used with a Foredom Flex-Shaft Motor, and to fit on a standard Foredom handpiece with a diameter of one inch. The speed is controlled with a foot pedal, leaving my hands free to guide my work.
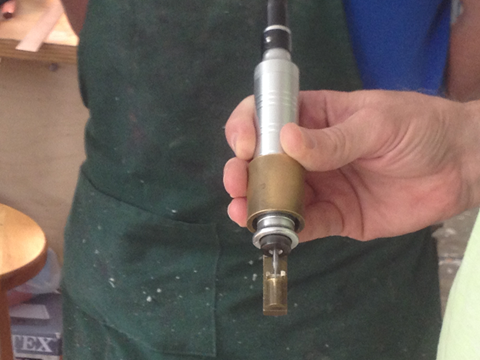
The purfling tool is made of solid brass so it has a nice weight, and is streamlined in design to be comfortable to hold with one hand. While in use, it glides over the edge of the instrument. The curved guide is tall enough to make it easy to lift the tool straight up out of the channel or lower it back in where needed. It is easy to adjust the distance from the edge as well as the depth of the cut. It has a 9mm distance from the guide to the centre of the endmills so I can use it on double basses as well. A few makers have creatively adapted the tool to their needs and I’m always interested to see what they’ve done.
I use high-quality carbide end mills to cut the channel. They work well at any speed and will cut a clean channel for at least six violins. After cutting the channel, I gently draw a round file over the channel to remove any fuzz from the corner of the channel.
Once I’ve set up the tool the way I want, it usually takes me about 30 minutes to carve the purfling channel in both plates, with another 30 minutes for finishing the corners and the area under the button.
It’s been fun to design, use and share the tool with so many fellow makers and to know that I’ve made the task a little easier for them.
Túlio Lima – wood support
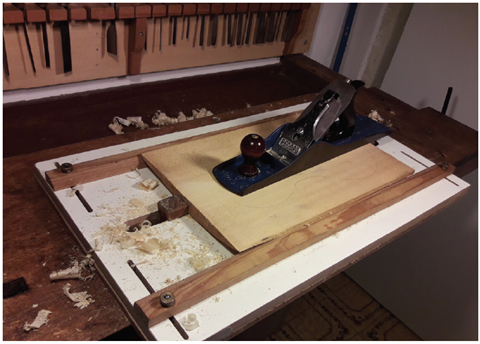
A while ago, I made a workbench accessory to support the wedges of spruce and maple that eventually form an instrument’s top and back plates. Since these pieces of wood are normally irregularly or asymmetrically shaped, it can be difficult to stabilise them on the flat surface of a workbench before planing. This simple design allows each piece to be clamped to a base. As far as I know, this is a unique idea although some makers might have designed something similar for themselves.
In the version shown here, the white base is made from MDF. It has four narrow channels cut into the top and bottom. Two wooden struts can be fixed into these channels using screws that I’ve made from old violin clamps. As they can be moved from side to side, they can be adjusted to the width of the piece to be worked on.
I have also cut a wider channel in the centre of the base. This is used to fit two benchdogs on either side of the piece to be planed, to keep it in place and stabilise it. The system is adaptable to everything from a neck-block to a one-piece violin back.
Theo Marks – mild steel lining knife
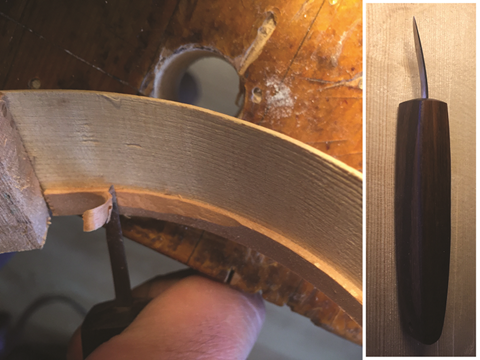
Recently, I unintentionally created a knife that I find quite useful for cutting back linings. On shaping a 4mm blank of unconventionally low-tensile ‘mild steel’ into a long, thin blade, I noticed that it had gained enough plasticity to be easily bent either left or right. Simply stressing the side of the blade against a flat surface will cause it to remain gently curved in the opposite direction.
Having instantly reversible control over the bend of a blade can come in handy when trimming back sets of linings that require cutting both towards and away from you. The blade won’t hold its edge as well as the more common, harder steels, but it doesn’t need to as I use it exclusively on soft willow or spruce linings. I’ve re-directioned that blade dozens of times by now, and I no longer worry about it breaking. Taking advantage of the plastic capacity of a low-tensile steel has helped me to trim linings more cleanly and efficiently.
Orest Putsentela – plate graduation drill press
My drill press for plate graduations is tremendously useful in my workshop. Essentially, the machine is a modified form of Stradivari’s thickness marking tool or graduation punch – modelled after the one in Cremona’s Museo del Violino – to mark the plate thicknesses. It is a combination of a graduation punch and a drill press. The tool was originally made and used as a graduation punch. The idea was to mark a plate thickness with a spike. To do so, you need to set up the proper distance between the spike and the top of the anvil and move the spike up and down to obtain the desired thickness. You can use a pencil beforehand to draw a preliminary thickness map on the plate; thus the thicknesses in different parts of the plate can be determined more precisely.
First, I place a plate in the centre of the drill press, against the anvil. Then, by moving my upper arm up and down, I can create impressions to the proper depth. These impressions become signposts for the proper plate thicknesses and prevent me from taking off more wood than needed, so that the plate does not become too thin.
To drill to the proper hole depth, I use a depth screw micrometer attached to the drill, with its spindle serving as an anvil. This means I don’t have to change the position of the drill. Moreover, setting the proper thickness is quick and easy, which is especially beneficial while copying the plate thicknesses of historical instruments.
The tool is large enough for it to be applied to violin, viola and cello plates. In spite of the high accuracy of the tool it is desirable not to drill holes to the final thickness but to leave at least 0.5–0.7mm for processing with scrapers and sandpaper. This way, the work will be accurate and clean.
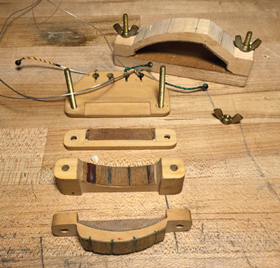
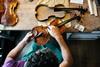
Geoffrey Allison – string holder
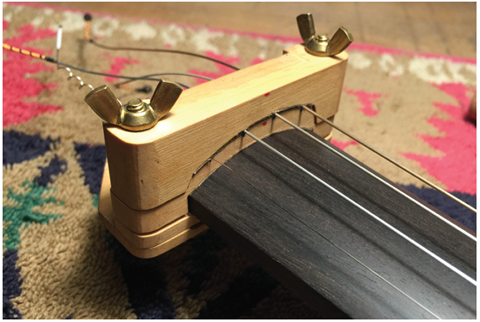
Here’s a device I made to hold the strings in place while fitting a fingerboard nut. The concept is simple: I pictured how to elevate strings at the end of the fingerboard with different heights. I use it for every instrument I make, to finalise the violin nut groove early on, rather than waiting for the very last step before the violin can be played in the white (and after the neck has already been glued).
The part of the violin making process that’s most fraught with danger is gluing the neck to the body of the instrument. The pitch, angle and tilt must all be correct in order for the ergonomics and tone to work; mishandling by a fraction of a degree can have many negative consequences. It’s advisable to finalise how the strings will be permanently positioned at the scroll end, and how they flow from peg to nut to fingertips to bridge to tailpiece to tail-gut to endpin.
The tool can probably be made in several ways. I simply use old strings and pieces of boxwood, secured together by two screws and wing nuts. Also, I used thin pigskin as the cushioning.
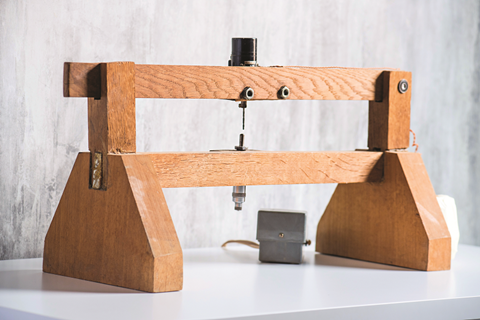
Sharon Que – soundpost sander

I originally designed and built this soundpost machine years ago, while employed at Curtin & Alf in Ann Arbor, Michigan. After we had had many brainstorming conversations, we realised that what was needed was two compound angles generated at a precise length. The soundpost sits in a brass cradle, held in a micrometer positioning stage, and it can be flipped 180 degrees to sand both ends. Once you figure out the compound angles on each end of the soundpost, you can reproduce it easily in any length. The final fit with hand tools is usually minimal.
For restoration work I always measure the original soundpost and compensate for the areas that are not fitting well. Then, when making a new post I normally increase the length by the amount needed. I keep a record of the angles, lengths, the date and invoice number on each soundpost I cut in my shop. Note: the motor shown in this picture is unnecessarily large – it just happened to be available in my shop at the time.
This article is from The Strad’s Accessories 2018 supplement, available with the June 2018 issue - download on desktop computer, via the The Strad App, or buy the print edition


1 Readers' comment