


Instrument repair requires great attention to detail, knowledge and patience – and teaching new students is no different. Here lutherie pedagogue Steve Rossow gives some tips acquired from his years of tutoring at Minnesota State College Southeast
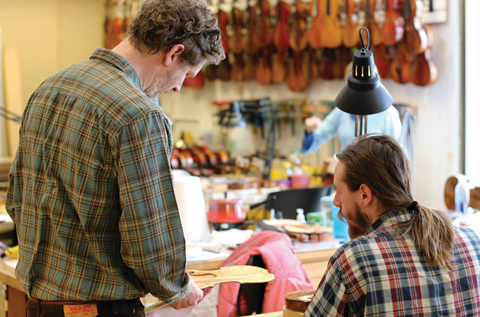
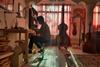
Luthier Steve Rossow’s classroom workshop at Minnesota State College Southeast in Red Wing, Minnesota, is a large, sunlit room filled with violins, hand tools, and spacious workbenches for the 12–15 students who typically enrol in the college’s two-semester violin repair programme each year.
Smells of old wood and varnish linger and sounds of concentration and quiet persistence (spiked on occasion with Rossow’s hearty laughter) fill the air. In addition to the skills being developed, there is a distinct sense of history and tradition coupled, perhaps surprisingly, with innovation in the work the students are learning to do. In its almost 50-year history, the college’s stringed instrument building and repair programme – often referred to in music circles simply as the Red Wing programme – has put a public college nestled in the sleepy, green bluffs of the Mississippi River on the national maps of luthiers, stringed-instrument dealers, and musicians.
A Red Wing graduate himself, Rossow apprenticed with John Waddle, ran his own shop, and now leads the college’s violin-repair programme, which is widely recognized as one of the most comprehensive of its kind in the United States. Students come from across the country and commit to a full-time, year-long immersive curriculum dedicated to all aspects of violin repair, including violin history, ebony work, bridges, soundposts, varnish chemistry, and finishing work. We asked Steve to share his insights into teaching the art and science of lutherie.
I don’t know if the way that I teach violin repair is particularly special, but it is definitely personal. From the feedback I get from students, alumni and the violin shops where they go after graduation, it appears to be working.
My approach in the classroom has several key influences. First, it’s informed by my own experiences as a student of lutherie – which have been wonderful and life-changing. Teachers and mentors really do have the potential to shape lives, and having been the beneficiary of others’ talent, wisdom and generosity over the years, I take very seriously my responsibility to pay it forward.
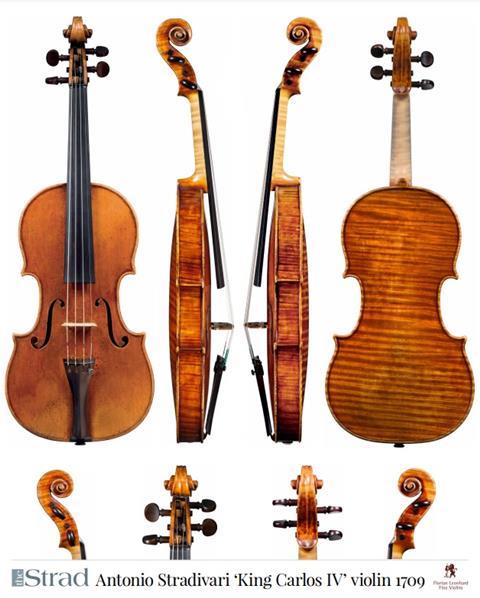
My teaching is also heavily informed by my work in the field. Spending the better part of 20 years as a luthier, learning from and collaborating with some of the most talented people in the business, and being exposed to instruments that are the stuff of legend and beauty can’t help but make a person better at what he does and enrich his perspective.
Finally – and critically – my approach in the classroom is shaped by having long ago come to the humbling realisation that being able to do something and being able to teach others how to do it, and do it well, are two very different things. I began my career in the classroom as a practitioner, not a professional educator. Now that I wear both hats, my teaching has benefited immensely from continuing my own education and learning how best to teach so that students most effectively learn.
Likewise, at the core of my instructional practices are several fundamental beliefs. First, that my students should get my full attention when we are together. I keep working with them until they get it right, not just until they get it done. Second, not everyone learns the same way or at the same speed. Third, incoming students bring different skills and levels of experience to the programme – and I need to understand and meet them where they are, before we can make meaningful progress.
Fortunately, my college supports structuring the violin repair programme in a way that is consistent with these guiding principles. We have a full-time, year-long curriculum, small class sizes, and well-equipped facilities that lend themselves to collaboration and innovation.
So what is my classroom like?
Let’s start with the physical setting and tenor. Aesthetic considerations aside, furnishings, equipment, technology, layout, and personal and group space and the expectations surrounding it all affect the workshop learning environment. Used thoughtfully and well, these elements contribute to it.
Many of my students come to Red Wing from busy lives elsewhere and/or previous careers. Before joining the programme, their days may have been filled with multitasking, social media and soundbites. It’s hard to shed those larger societal trends and values at the workshop door, but I try to minimise distractions and extraneous chatter – be it live or hand-held – once we settle down to business each day.
That’s not to say that we eschew technology altogether. Some readers of this piece may be familiar with my work developing and using computer-assisted technologies in the field of lutherie. I’m not opposed to using modern technology in the classroom either, but it is always a conscious pedagogical choice – never a default.
For example, my classroom is equipped with a high-definition video system that projects on to a large monitor at the front of the room. This technology is helpful for explaining work that is too small to see from more than a few feet away. The camera can zoom in to capture extremely fine details of my lecture demonstrations and students can watch from their benches, where they have access to their hand tools and materials and can attempt to replicate a certain technique in real time, concurrent with what they are observing.
Most of the time, however, I prefer to have students gather at the front of the room for group instruction. In fact, I begin most days this way, by inviting everyone up close to my workbench as I demonstrate the day’s project or topic. I want to start the day connecting with each student, even if only with eye contact. This close proximity allows me to gauge whether my lecture or demonstration is resonating and helps me understand and meet my students where they are at on any given morning. I also find that my students tend to be more focused when they are on their feet, up close. Especially before the caffeine kicks in.
Not only does this build community and encourage discussion, it has other benefits. If students are just watching a screen, they won’t see exactly how I’m holding a tool. They can’t adjust their position to observe what I am doing from a different vantage point. I want them to realise how much pressure I am using with the technique: is it coming from just the fingers, or the fingers and wrist, or the whole arm, or for that matter, the whole body? They need to understand which muscles are moving the tool.
Most new students have a hard time seeing the graceful curves and lines and shapes that make for quality work. I remember when I was starting out as a student of lutherie: it was hard to see, at first, what my teachers were talking about, and it could be frustrating. When a student brings me work now, of course, there are issues that are obvious to me, but they can’t always see them.
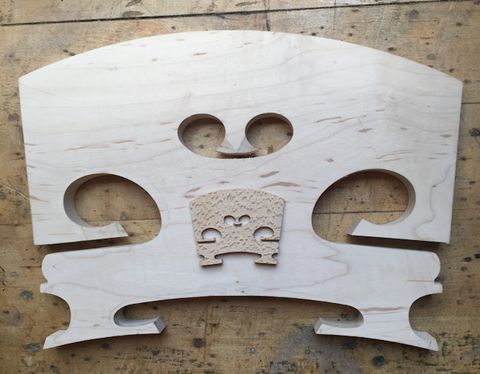
I have come up with a couple of techniques to help with this. I have built a giant scale mock-up of a violin bridge that measures 7 inches by 10 inches. In the giant format it’s easier to show the students exactly what I’m talking about. For example, I can show them the side bevel on a bridge, then point out the same bevel on the mock-up, at a scale they can see.
I have also worked up CAD (computer-aided design) drawings of various violin parts with intentional mistakes and made an assignment out of finding the flaws in the curves. I start with fairly obvious wobbles and progress to minuscule errors. They have to find the flow with their eyes; with time they’ll be able to see to see a dip or divot in the line.
In the early stages of each new academic year, I find that many of my students have to spend some time learning to set aside the misguided notion that speed is the primary goal. I do not want a new student to strive for speed. That sort of striving leads to inattention, mistakes and sloppy work. Rather, I want them to strive for understanding, building their knowledge and skills through persistent effort, and ‘getting it right’. Good work comes first; only after that do we begin to improve speed and efficiency.
As a career, violin repair involves deadlines and requires time management and efficiency. But in the classroom I place a higher value on the quality of the work than on how quickly it is performed. Since my college’s programme is focused entirely on repair, our students benefit from repeating assignments over and over – doing ten violin bridges and soundposts, six for cellos, and so on. I don’t do timed exercises, at least not at first. I find that increased efficiency comes naturally as the students repeat the skill over and over again.
Not long ago I had a student who did stunningly beautiful and precise work. She always took as much time as was given, honing and refining her work right up to the deadline. She might have been the very last person in the class to turn in her assignments, but her patience and persistence allowed her talent to develop in accord with its potential and her work was always outstanding. She was recently hired by one of the top violin restorers in the US.
Things tend to work best when I start the year with the assumption that my students know absolutely nothing about lutherie
The last thing I am going to discuss is the practice of meeting my students where they are, and going from there. My incoming students bring different skills and levels of experience to the programme, and in order to make meaningful progress I need to make the classroom a safe place for them to admit what they don’t know, to ask questions, to make mistakes – and to learn from them.
In addition to the practice of taking a visual and aural inventory of my students when I gather them to my bench at the front of the room each morning, I encourage students to check in with me as much as they want or need throughout the day. I model this by making lectures interactive, by constantly circulating through the workshop, and by affirmatively reaching out to students when they are working at their benches.
When I started teaching, I initially caught myself making a big mistake: I assumed that my students already knew something because it was obvious to me. This is a very easy mistake to make. What is a soundpost? How does it work? What makes one good or bad? And why? As a teacher, I have found that things tend to work best in my classes when I start the year with the assumption that my students know absolutely nothing about lutherie. They may bring with them amazing life experiences. They may even be amazing musicians. But in the classroom we respect and encourage the concept of ‘beginner’s mind’. I explain everything, encourage questions, and then watch exactly how each student is doing a task to understand why it is or is not going well.
The first four weeks in my programme are devoted entirely to tools. This is before the students even start learning about and working on repairs. We begin with the necessary hand tools, but none of them are ready to use. That is intentional. Students must learn how to flatten planes, grind chisels, and make curved scrapers – and how to use them properly and safely.
Then I’ll hand them a rough block of wood that they must make flat and square working just with the hand tools. It sounds easy, and some students can do it right away, but others have a hard time with it. It might take a student two days and many failed attempts before they can complete the assignment.
Although I teach every aspect of repair the ‘old school’ way by hand, the students also learn how to use power tools correctly and safely. They might use various power tools to make a fixture to hold a fingerboard to be planed, or make a cradle to hold a violin body. In the second semester they will occasionally use power tools in repair, like cutting a cello bridge to its rough size with a bandsaw. Some violin shops will have power equipment on hand, and their use can accelerate some processes. But the final ten per cent of every repair is done with hand tools.
When students are struggling, I go with them to their benches and get them to show me exactly how they are doing it. I have to drop my assumptions about what’s going on; I have to figure out why, look at it from a different point of view.
I had a student whose touch-up work was not going well. When I went to his bench and watched him work, I realised he was pushing the brush against the wood right up to the ferrule, and the bristles were mashed and spreading out. When I saw what he was doing, it was easy to explain and correct his technique.
When you get a student like that who works so hard, it validates you as a good teacher. The students who really apply themselves, who really want to get it right, who try to get to the quality that I’m trying to show them — they make it all worthwhile.
Luthier Steve Rossow teaches Violin Repair at Minnesota State College Southeast in Red Wing, Minnesota. He graduated from the college’s string instrument repair programme in 2002, where he studied with Lisbeth Nelson Butler, John Reed and David Vincent. He then apprenticed with John Waddle in St Paul, MN, US, learning violin making and advanced restoration.
Steve returned to Red Wing as a full-time instructor in 2010, teaching advanced guitar construction, computer-aided drafting, and the use of CNC work in instrument making. He became the college’s lead violin repair instructor in 2017.


No comments yet