


Do you feel tired and stiff after performing? Pilates instructor John Black explains how some simple stretching exercises can make all the difference
Read more Featured Stories like this in The Strad Playing Hub
Musicians have the general problem of having to stay in one – often far from natural – position for long periods. In addition there is a lot of rotation involved, with extraordinary demands made on some small muscle-groups. This can easily be a recipe for the ills that befall body tissues held for too long in one position: neural compression, reduced blood flow, joint stiffness and collagen creep. Tissues are chemical structures that obey the rules of chemistry and biomechanics, so elastic (or other) fibres, if stretched too far or for too long, can potentially deform permanently.
It is important to be in good posture whenever possible, so that the different parts of the body are correctly aligned, thus placing minimum stress on body tissues. However, the reality for a musician is that less-than-ideal posture is inevitable. The consequences include the overworking of some tissues and underworking of others, leading to imbalances in flexibility and strength; and the misalignment of joints, which then undergo more wear and tear than they would otherwise.
Damage to muscle fibres and connective tissue – which occurs especially during eccentric muscle contractions, when muscles are both lengthening and contracting at the same time – can result in muscle tears and the formation of scar tissue, which tends to shorten muscle fibres. So stretching at the appropriate time in the healing process is necessary to counter this.
The first priority, especially after a long performance, is to restore correct postural alignment as quickly as possible. This is the purpose of the ‘warm-down’ exercises here, which should not take more than a few minutes to do and can be done without invading anyone else’s space, often while seated. One small caveat: if in attempting to correct stiffness you experience any neural ‘zinging’, seek professional advice.
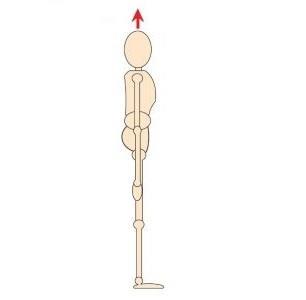
1. STAND TALL
Stand with feet hip-width apart, draw your lower tummy in and up (a little) and lengthen up through the crown of your head, looking straight ahead. Let your arms hang by your sides, palms facing into thighs. Relax your shoulders and draw shoulder blades gently down your back, but without sticking out your lower ribcage. Then take a few deep breaths, breathing IN to the sides and back of your ribcage and OUT drawing your abs in slightly more.
2. BIG SHOULDER-CIRCLES
Bring your shoulders up to your ears, letting the arms just hang. Then try and touch shoulder blades behind, as you circle your shoulders. This is purely to loosen up your shoulders. Reverse the circles.
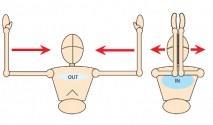
3. DUMB WAITER
Have your forearms parallel to the floor and each other, with palms facing up and elbows into your sides. As you breathe OUT (drawing your tummy in a little), rotate your arms out, keeping your elbows into your sides as much as possible. Breathe IN to return them to parallel.
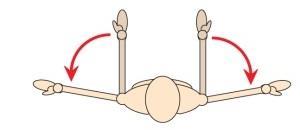
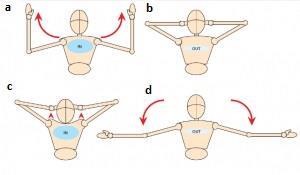
4. OPENINGS
Have upper arms in line with shoulders and have a right angle at your elbows, palms facing front. Breathing OUT bring right-angled arms tightly together (elbows as well). Breathe IN as you take them wide and stretch back.
5. FLOATING ARMS
[a] On an IN-breath, float your arms up (hands just forward of shoulders), keeping your shoulder blades drawn down.
[b] Breathe OUT, bringing your forearms behind your head.
[c] On an IN-breath, shrug your shoulders as high as possible.
[d] On an OUT-breath, lower shoulder blades as far as possible and float the arms back down, keeping shoulder blades drawing down.
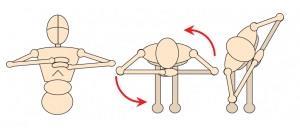
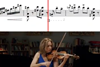
6. THE COSSACK
Place one forearm lightly on the other, keeping shoulders relaxed and open, with shoulder blades drawing down your back, and breathe IN. Breathing OUT, rotate arms and head as one unit to your right, keeping your pelvis facing forward. Breathe IN to return to the front and OUT to turn to the left. Keep alternating. This exercise is easier to do sitting (as illustrated), because your pelvis is fixed.
7. SIDE REACHES
Stand with feet parallel and hip-width apart. Breathe IN to lengthen up through the spine, raising one arm as you try to keep that shoulder blade drawing down: breathing OUT lengthen as you reach upwards towards the opposite corner of the room, the other hand going down your thigh. Make sure you only go over to the side. Breathe IN to lengthen up again. Alternate side to side.

8. FLEX AND EXTEND
Breathe IN and lengthen back and up through the crown of your head, extending your spine back a little while drawing in your tummy. Breathe OUT as you nod your head (chin to chest) and curl your neck forward.
9. NECK TURNS
[a] Standing tall (eyes straight ahead), keeping chin parallel with the floor, gently turn your head from side to side to look over each shoulder.
[b] Be tall and look straight ahead, drop chin to chest, then take the head directly back to look over your head, before coming back to look horizontal again.
[c] A side neck bend. Keep your head to the front throughout, and take your ear over to your shoulder each side. (Any neural ‘zing’ – stop!)
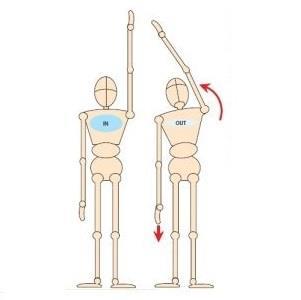
10. ARM AND FINGER STRETCHES
Hold your right arm out straight in front of you, palm down and elbow locked. With your other hand, gently draw back your fingers. Keep your arm the same, but this time bend the wrist over, drawing the hand back towards you with the other hand. Repeat on the other side. Hold your hands out in front of you, elbows soft, take first and second fingers together away from the fourth and fifth, also together, creating a gap. Return, and alternate with separating first and fourth fingers from the middle two, which stay together
11. ROLL DOWNS
If you have no serious issues with your back, roll downs (standing with the knees slightly bent, dropping the chin to the chest and letting the rest of the spine gradually curl down towards the floor) are a great exercise to include somewhere in your routine. Do them either with your back against the wall (easier on the back) or free standing.
This article was first published in The Strad's December 2005 issue
Read: 6 holistic warm-ups for violinists
Read: 8 tips for good muscular health as a performer
Read more Featured Stories like this in The Strad Playing Hub
The number one source for playing and teaching books, guides, CDs, calendars and back issues of the magazine.
In The Best of Technique you’ll discover the top playing tips of the world’s leading string players and teachers. It’s packed full of exercises for students, plus examples from the standard repertoire to show you how to integrate the technique into your playing.
The Strad’s Masterclass series brings together the finest string players with some of the greatest string works ever written. Always one of our most popular sections, Masterclass has been an invaluable aid to aspiring soloists, chamber musicians and string teachers since the 1990s.
American collector David L. Fulton amassed one of the 20th century’s finest collections of stringed instruments. This year’s calendar pays tribute to some of these priceless treasures, including Yehudi Menuhin’s celebrated ‘Lord Wilton’ Guarneri, the Carlo Bergonzi once played by Fritz Kreisler, and four instruments by Antonio Stradivari.


1 Readers' comment